


A lot of men today are clueless when it comes to tools. The increased affluence of the past 50 years led many men to outsource handyman work instead of doing repairs and home improvement themselves. And let’s face it. Men today can be pretty darn lazy. They’d rather play their Xboxes than work on building something with their own bare hands.
But knowing how to handle tools is an essential skill every man should, well, have a handle on. You’ll become more self-reliant, you’ll save money, and you’ll enjoy the supremely manly satisfaction of working with your hands. To help the generation of men who never got around to learning how to use tools, we’ll be doing a series of posts on basic toolmanship.
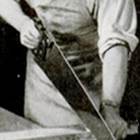
To kick off our series on tool use, we start with the lowly hammer. To the unskilled, hammering just means pounding the hell out of something until you get the job done. Sure, you could do that, but you’ll end up with crummy results and a tired arm to boot. A wise handyman knows how to use a hammer safely, effectively, and efficiently.
Types of Hammers
Proper hammering begins with selecting the right hammer for the job. Using a hammer for tasks that it’s not suited for can result in injury and shoddy work. Below, we give you the skinny on the different types of hammers a man has to choose from.

16 ounce claw hammer. If you’ve only used one kind of hammer in your life, it’s probably this one. Its curved back makes it ideal for pulling out nails. This is a must for any man’s toolbox.

16 ounce ripping hammer. When you have a small demolition job, this is your go-to hammer. Unlike the claw hammer, the back of a ripping hammer is straight. It’s used for heavy carpentry work, framing houses, and of course, ripping crap up.

Rubber mallet. Use a rubber mallet when you hammer a finished-metal surface.

Wooden mallet. Carpenters use wooden mallets to strike wood chisels during carpentry work. Don’t try drywalling with a wooden mallet. You’ll just end up with a bunch of splinters in your face after the head smashes into a million pieces.

Soft-face hammer. When assembling furniture or working on some other decorative wood project, you need a hammer that will drive a nail without marring the surface of the wood. Go with the soft-face hammer for this job. The faces of soft-face hammers are usually made of plastic or rubber.

Ball peen hammer. Ball peen hammers are used in metalworking tasks like center punching and shaping soft metal.

Mason’s hammer. Use a mason’s hammer to cut and set bricks when laying that new walkway.

Upholster’s or tack hammer. The smaller face is designed for driving tacks in upholstery work.

Drywall hammer. The serrated face of this appropriately named hammer gives you a better grip on the nail when installing drywall. You can use its hatchet-shaped back for cutting drywall.

Huge ass sledge hammer.For big demolition jobs, bring out the big guns. Concrete, walls, and porcelain bathtubs are no match for a 10 pound sledge hammer. It also comes in handy at state fairs when attempting to win your girl a giant teddy bear.
Parts of a Hammer

Hammer Safety
Use the right hammer for the job. Don’t upholster a couch with a sledge hammer or drive drywall nails with a tack hammer. You won’t get the job done right, and you might end up injuring yourself.
Don’t strike a hardened steel surface with a steel claw hammer. Flying metal chips can injure you or a bystander.
Never use a hammer with a loose or broken handle. The hammer head could come flying off while in use. If you don’t want to explain to your wife why grandma’s china cabinet is in a million pieces, replace the handle if it’s loose or cracked.
Never use a hammer with a chipped or cracked head. It’s an accident waiting to happen.
How to Handle a Hammer
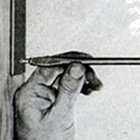
Where to hold the hammer. Hold the hammer like you’re shaking hands with somebody. When you need more control over the hammer, like when you’re starting a nail, grip the hammer closer to the hammer head. When you need power, grip the hammer near the handle’s end.
Starting the nail. Place the nail where you want to drive it and hold it between the thumb and forefinger of your non-dominant hand. Place your fingers near the top of the nail when holding it. If you hold the nail near the bottom, a missed hammer swing will crush your fingers between the wood and the hammer. Not a pleasant feeling.
Grip the hammer near the middle of the handle. Tap the nail lightly until the nail has sunk into the wood enough that it can stand on its own.
If you’re driving in nails that are too small to hold between your thumb and forefinger, use this handyman tip: Grab a piece of thin cardboard or thick paper and push the nail through it. Instead of holding onto the nail, you hold onto the cardboard. Remove the cardboard before you finish driving the nail.
For some hardwoods, it’s a good idea to drill a pilot hole before you hammer in a nail. It makes the job easier and prevents the wood from splitting. Which brings us to our next point-
Preventing wood splitting. In addition to creating a pilot hole, lubricating the nail with beeswax and blunting the nail will also keep the wood from splitting. To blunt a nail, simply tap the nail point with your hammer. Also, avoid hammering a nail into the grain of the wood.
Swing from the elbow for power; swing from the wrist for control. For maximum power and efficiency, swing from the elbow. When you need more control and finesse, swing from the wrist. Many hammer newbies try to hammer with just wrist action.
Focus on the nail, not the hammer. When hammering, you want to avoid sideways and glancing blows. To score a direct hit every time, focus on the nail head, not the hammer.
Let the weight of the hammer do the majority of the work. You don’t need to use every ounce of strength in your body when hammering. That will only lead to wild swings and bent nails. The weight of the hammer head plus your smooth swing provides enough force to get the job done.
Advanced Hammering Techniques
Clinching nails. Let’s say you drive a nail through a 2×4. The nail is longer than the board is thick, so when you drive in the nail, the nail’s point sticks through the board. You don’t want to leave those points hanging out to snag people’s clothing or scrape their skin. So you’ll want to clinch the nail. Simply strike the tip of the nail at an angle and force it down flat into the board with light taps. Sink the tip below the surface of the board with a sharp rap. When you clinch a nail, always clinch with the grain. In addition to preventing ripped shirts, clinching also lends a nail greater strength and stability.
 Example of toenailing
Toenailing. When you need to nail one board perpendicular to another, like in a framing job, bust out the toenail technique. Toenailing involves driving a nail at an angle through the end of the board to anchor it to another board. To toenail, place one end of the board perpendicular to the board you want to nail it to. Drive the nail in at a 60 degree angle. It can be tricky starting an nail at an angle, so begin by making a pilot hole by tapping the nail point straight into the board. Once you have a hole, tip the nail point to the correct angle to finish driving it in. Brace your foot behind the board as you hammer, so the board doesn’t move from its spot. Toenail a second nail on the same side and two more nails on the opposite side.
Removing Nails
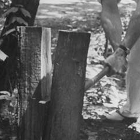
Claw hammers are designed to remove nails. Simply slide the claw underneath the nail head. Pull the hammer’s handle towards you to extract the nail. Here’s an old trick from grandpa to help you pull nails: Stop the first pull back before the hammer’s poll touches the surface of the wood. Place a wood block under the hammer head to provide some leverage. Using the block puts less strain on the hammer’s handle and allows you to lift the nail straight up without bending it.
 Place a block under the hammer after the first pull back
Some nail heads are too small for the tongs of the hammer to grasp. To deal with such nails, hammers are sometimes made with a small v-shaped notch in one of the prongs. If yours lacks this feature, you can simply file a v-shaped notch into one of the claws with a metal file.
Further Reading:
Toolmanship: Wrenches
Toolmanship: Screwdriver
Toolmanship: Handsaw
Toolmanship: Hammer
Have any more hammering tips? Share them with us in the comments.
Related Posts
-
 Toolmanship: How to Use a Handsaw
-
 Toolmanship: How to Use a Screwdriver
-
 How to Split Firewood
-
 How to Build a Quick and Easy Sawhorse
-
Share:
-
- Tweet
-
 Email Story to a Friend
-
-
 Print
Print


{ 43 comments… read them below or add one }
Love it. Can’t wait for more of this series.
You forgot this one:
http://en.wikipedia.org/wiki/War_hammer
The upholster’s or tack hammer also has a slightly smaller magnetic hammer face, look at the one that is split. Use it to pick up a tack, get it started without mashing your fingers and then rotate the hammer to the broader face in order drive in the tack. It is one of the handiest hammers to have around the home for light work such as tacking or putting up picture hangers. I have several, one of them was my father’s and is over 50 years old. I also have my grandfather’s ball peen hammer.
Tip: When driving a short nail, brad, or tack you can use a pair of needle nose pliers instead of your thumb and forefinger to hold the fastener. Once started you remove the pliers to drive the fastener flush.
There are actually quite a number of different hammers in addition to the 10 listed, but as pointed out they have specific tasks. That being said the ones listed in this story are probably all that we need at home.
If you are poking around in a thrift shop or garage sale and see a military manual titled “Basic Hand Tools and Their Uses” buy it. It is one of the most informative books on the subject that I have ever seen
Great post. I learned this the hard way: when I was a teen working construction, my boss was holding a nail I couldn’t reach while I swung with the hammer. One missed swing + one pissed off boss = one teenager looking for a new job.
Having grown up around an uncle who grew up on a working ranch, I agree that many men seem to lack a lot of “handy man skills”. Although I do have one nit to pick with the article. That isn’t a “drywall hammer” It’s a roofing hammer or hatchet. The hatchet blade is for splitting shakes or wooden shingles to fit. The odd little notch is for pulling roofing nails from under asphalt shingles when patching that kind of roof.
I was once taught that when holding a hammer the thumb should be on top of the handle, pointing toward the head for better control. Of course, I was about 12 years old when I learned that from a guy who was helping my dad build an addition to the house, so I don’t know what kind of authority he was on the subject. But it works for me.
Greg- Shingle and drywall hammers look very similar. But rest assured that’s a drywall hammer. Drywall hammers have the traditional neck, poll, and face of a claw or ripping hammer. Most shingle hammers don’t have the defined neck, poll, and face. They look more like axes.
To compare-
Drywall hammers: http://bit.ly/1LVbg9
Shingle hammers: http://bit.ly/v5ySg
If you’re trying to stretch the life of your hammer how do you fix it? With a nail, of course! If the head is getting loose use another hammer to drive a nail into the eye of a wood handled hammer, thus splitting the wood and holding the head to hold you over until you get a new one.
After a few decades of hammering, I have recently learnt an improved technique. I used to hit the nail lightly while holding the nail, remove my fingers from the nail, and then hit it hard. This sometimes would result in a missed first hard hit.
I now give a couple more light hits after removing my finger before hitting the nail hard. This sounds a little thing but it reestablishes your swing accuracy after the break in concentration caused by removing your fingers and possibly adjusting your balance.
As a carpenter i think your article was excellent with the exception of 1 point. It was hammered into me as an apprentice always hold your hammer at the bottom. A hammer should be held like a lady. You hold her hand, you don’t grab her by the neck.
Hey thanks – NOW I know what to use my rubber mallet for (got it as a gift cause my friends thought it was a judge’s mallet lol)
Yavor
If you don’t have any beeswax butter works well for lubricating the nail.
The amount of men today who don’t know how to use construction tools is quite sad. At my current place of employment, I’m considered the resident “handyman” because I’m the only person there who knows how to use all the tools in the toolbox and the circular saw in the maintenance closet.
Want your sons to know how to handle tools? Skip the plastic “just like daddy” toys when they are toddlers and give them the real deal. A box of nails, a pile of wood scraps and a small hammer are a dream come true for a 3 year old boy. If he’s got an issue with impulse control and you’re afraid he’ll smash a window then better wait a couple years. But the kids I’ve known are so into their little projects that the thought of causing destruction doesn’t even occur to them. The worst that happens are a few splinters and a banged thumb. Let ‘em design their own stuff, don’t teach them to build a birdhouse unless they ask. Banging nails is child’s play. When did they start marketing plastic pretend-tools, anyway? What a stifling, frustrating, over-protective idea.
The drywall hammer also has a rounded face so it will leave a dimple in the drywall to be filled in later with joint compound.
Brett–
Thanks for the clarification. I now know I’ve spent too much time on a couple of roofs with the “wrong” hammer.
Great MANLY article. Loved it!
“Skip the plastic “just like daddy” toys when they are toddlers and give them the real deal. ”
Plus, then it looks like you’re getting tools for your kid, but really you’re getting a backup set! My son’s mini-hacksaw has come in handy more times that I ever would’ve expected.
For those of us with daughters… go ahead and set them up with real tools and wood too. Nothing makes me happier than knowing my girls can use a hammer, a drill, and eat the spicy salsa with gusto.
If you want to get a set of children’s tools, then get the minature set of real tools. The ones that have a little hammer, tiny pliers, miniature saw, etc.
They are great and will last many times longer than any plastic crap!
Great new series! As an amateur handyman, I try to spread my craft to every guy my age (24) who will listen.
One point though, when swinging a hammer for power you are actually supposed to swing the shoulder, keeping the elbow slightly bent. the same swinging motion as if you were chopping something with a hatchet. You might miss the nail often in the beginning, but accuracy comes quicker than you’d think – it’s quite impressive when you can drive a 4″ 16p nail into redwood in 2 blows!
@oznick love the comparison – hold it like a lady: the hand not the neck. brilliant!
When hammering metal use a hammer made of the same metal otherwise one may damage the other.
When removing nails I do not recommend as shown in the diagram. Instead, roll your hammer to the side rather than over the head. This applies less strain to the head of the nail by pinching the shaft rather than pulling on the head. You are less likely to pull the head off the nail. Also a “cats paw” is an important tool to use in nail removal, especially framing nails.
great article – looking forward to more in this series!
thanks, drew! as a daughter, nothing makes me happier than knowing how to use a hammer and drill (and many other things, though i still can’t bear spicy salsa) – except, perhaps, learning more about it from my dad! (and, as i have begun to learn, just think of the money she’ll save being able to do her own fixer-uping on her first house =)
Another kind of sledgehammer…. the Maul! I used one of these extensively through college on all sorts of man-outings. It’s a sledge hammer on one side, and axe/splitter on the other. Very useful in the middle of nowhere.
http://www.drillspot.com/pimages/402/40213_300.jpg
Super-important for long-term health: DO NOT place your thumb along the handle of the hammer, wrap it around like you’re gripping a baseball bat.
I’m an amateur Blacksmith and I see this a lot with new smiths. For some reason they think they get more “control” if they put their thumb along the handle instead of wrapping it around. The net effect of this is to lock one of the tendons in your wrist so that it does not give when the hammer rebounds. Long term, this can cause a serious repetitive strain injury. Heck, after only one afternoon of hammering this way, you’ll be super sore.
Also, since the article covered hammer types:
http://www.ngkmetals.com/image/store/productImages/H-90-Hammer.jpg
A Blacksmiths or Cross Pein Hammer. The shape of the pein will vary somewhat with task and national style (reference a “German pattern” blacksmiths hammer (above) vs. a Swedish Pattern hammer). The cross pein is used as a “fuller”, for thinning hot metal across a specific line, rather than “out from the center” as with a regular hammer face or a ball pein (more concentrated)
So i have a claw hammer that has the head and handle forged from a single piece of steel. But, it still has an eye. Why is that? Since the handle is not a separate piece, and thus does not get inserted into the eye, why would an eye exist on this hammer?
I feel like using a sledge hammer on concrete is asking for trouble . . . Don’t jackhammers have a hard enough time with concrete, let alone wailing on it with something held in your hand? I can feel shockwaves in my arm just thinking about it. Perhaps I am misinformed, but I was always under the impression that concrete was nigh indestructible. Has anyone done this before? With success?
This is a technique that I learned from my father who grew up with old German carpenters. When gripping the handle of the hammer, wrap your thumb and index finger at the fulchrum of the hammer, and allow the hammer to swing freelyl. When swinging your hammer down, push the rear of the handle with your remaining fingers, giving the hammer a little extra force when it strikes the nail. This has the same effect as the extra force you give your driver when swinging your wrists through on a power drive
Sledge hammers are essential for concrete demolition. While a ten pound hammer will do the job, they, along with eight pound sledge hammers, are mostly used for driving concrete pins (these are 1-4 foot *1″ steel pins used for building concrete forms) into the the ground. Simply cutting the handle in half makes these sized hammers ideal for thins kind of work. For breaking concrete, larger hammers, usually 12-20 pounds, are used. These coupled with a spud bar, some call them dig bars, which are 4-6 foot long hardened steel bars, do a wonderful job. Jack hammers can only do so much before you have to use some good old fashioned muscle. Besides, if you want a killer work out, there are few better than breaking concrete!
I was an adult apprentice with a bridge building false work (concrete form) crew. I used to carry heaps of crap on my belt now i just have a 28oz framing estwing, pencil, tape and chalk line in the pouch. I give my hammers a real hiding breaking an “indestructible” estwing every 5-10 years. For fun while waiting for weather to break we will have competitions driving 3inch nails to see how many you can drive in row with a single blow. Don’t bother with soft starts you will learn to drive a nail accurately after you smash your thumb a couple of times. It is a good workout but you end up with i huge hammer forearm and one puny arm.
Great article, like always. What sticks in my craw (there’s a good old-fashioned saying for you) is the fact of “They’d rather play their Xboxes than work on building something with their own bare hands” which is unfortunately all too true these days. IMO, men do not play video games, although I know men close my age (38) that still do. It is one of those things that just really gets to me. I try to follow the verse, “When I was a child, I talked like a child, I thought like a child, I reasoned like a child. When I became a man, I put childish ways behind me.”
On an unrelated note, has there ever been a post regarding old sayings (like stick in my craw) that you don’t here anymore? I have a few of them stored in my brain from my parents’ generation that I pull out every once in a while to the amusement of my wife and kids.
In your diagram, you label the back of the hammer as the claw. This is accurate for the hammer pictured, but it’s called a _____ peen for may others, and in many cases, such as the ball peen, the hammer name indicates the name of the peen. Overall, good article though.
http://www.hnsa.org/doc/tools/img/fig001.jpg
Check out this article for full details.
http://www.hnsa.org/doc/tools/index.htm
Great article…. I suggest an article shovels next.
I think the job that gave me the most hammer expereince was reroofing a building at the fairgrounds. I was in still in high school and our FFA group took on the job. The roofing material was corrogated tin and we had to drive nails in without predrilled holes. Holding that nail in place until it pierced the tin and then driving it intil it just seated was quite a trick. Vise grip pliers soon became a commodity on the job LOL along with thumb size bandaids. Holding that nail and hitting it perpendicular were a must!
When I was learning to use a hammer I was told that the unused part of the handle would be cut off if I didn’t start holding the handle at the end LOL.
This is great.
Now how about doing a post on nails (unless you already have and I missed it); what kind to use in what application, what are the sizes of nails, etc.
There is nothing more embarrassing than to go to the hardware store and not know what kind of nails you need. It’s like owning a gun and not knowing what ammo to use.
It seems like a small thing, but I noticed in one of the above posts a reference to a 16p nail. It should be 16d nail. I was always taught by my Grandpa that you use the right tool and you call it by the right name.
Also, part of the reason a lot of men don’t know how to swing a hammer is because of the nail gun. Power tools are great, but sometimes you have to use a hammer.
I can identify 4 types of nails that would cover almost all building applications, 2inch & 3 inch BULLET HEADS (framing, formwork & most rough carpentry) BRADS (small thin nails used for intricate fixout, trims, mouldings architrave, think inside after drywall, almost always gun fired & near impossible to hand nail due to their wire thin gauge) CLOUTS (used in roofing, to hang drywall, fence pailings, fascia etc) HARDENED CONCRETE (used to fix things to concrete, steel and any other super hard material usually gun fired with an explosive charge also nearly impossible to remove without ruining your hammer cause they are specially hardened. All nails are available galvanised and to a less extent stainless for external work to prevent corrosion.
Good sites!
My father-in-law is a journeyman carpenter and he taught me a trick for holding nails. When starting the nail, hold it between your first two fingers with your palm up. It’s easier to hold and if you miss the nail and hit your fingers you won’t smash your fingernail. This works really well, especially when you have a lot of nails to hammer.
Good post. Its very informative and useful post. I learned a lot how to hammer.
I just wanted to say good job. I really enjoy reading your posts.
I don’t see any mention of dead blow hammers. Another special class but the only way to get some jobs done.
I’d add also to wear either your regular glasses or a pair of non-geek looking safety glasses. You’d be surprised at how bits and pieces of either the nail or whatever you’re nailing it to come flying off.
A special type of soft-face hammer is the “deadblow.” It is a mallet-type configuration, but it is not a solid shaft. Instead, a plastic or nylon sheath is filled with shot, producing no rebound after the blow, as a solid shaft would. Hence, deadblow. All the energy goes into the target, not the rebound. Also, the faces of the striking surfaces are convex, reducing the chance of a mark caused by edge of the striking surface. Cabinetmakers use them to drive panels into place, especially dovetailed carcasses.
The article doesn’t mention my favorite hammer: the drilling hammer which is like a miniature one handed sledge hammer. With a heavy head and short handle it combines force and control. When I have a tough job like separating seized parts or chiseling this is the bad boy I reach for.