
(Edited to add: Visit this post to get more information on purchasing a table if that's more your thing! :) )

First, I just wanted to say thank you guys for all the love, sweet comments and emails about the original table. I loved being able to pass all that on the Hub's.
My Hub's wanted to rebuild the table from scratch so that he could show you step by step how to build one for you. Originally, we intended on doing a complete video tutorial.
That would have been awesome.
But about 30 seconds into videoing it, the boys started screaming, and interrupting the Hub's, and asking us for a million things, and we realized that there was no way in hell we would be able to video it with the boys home.
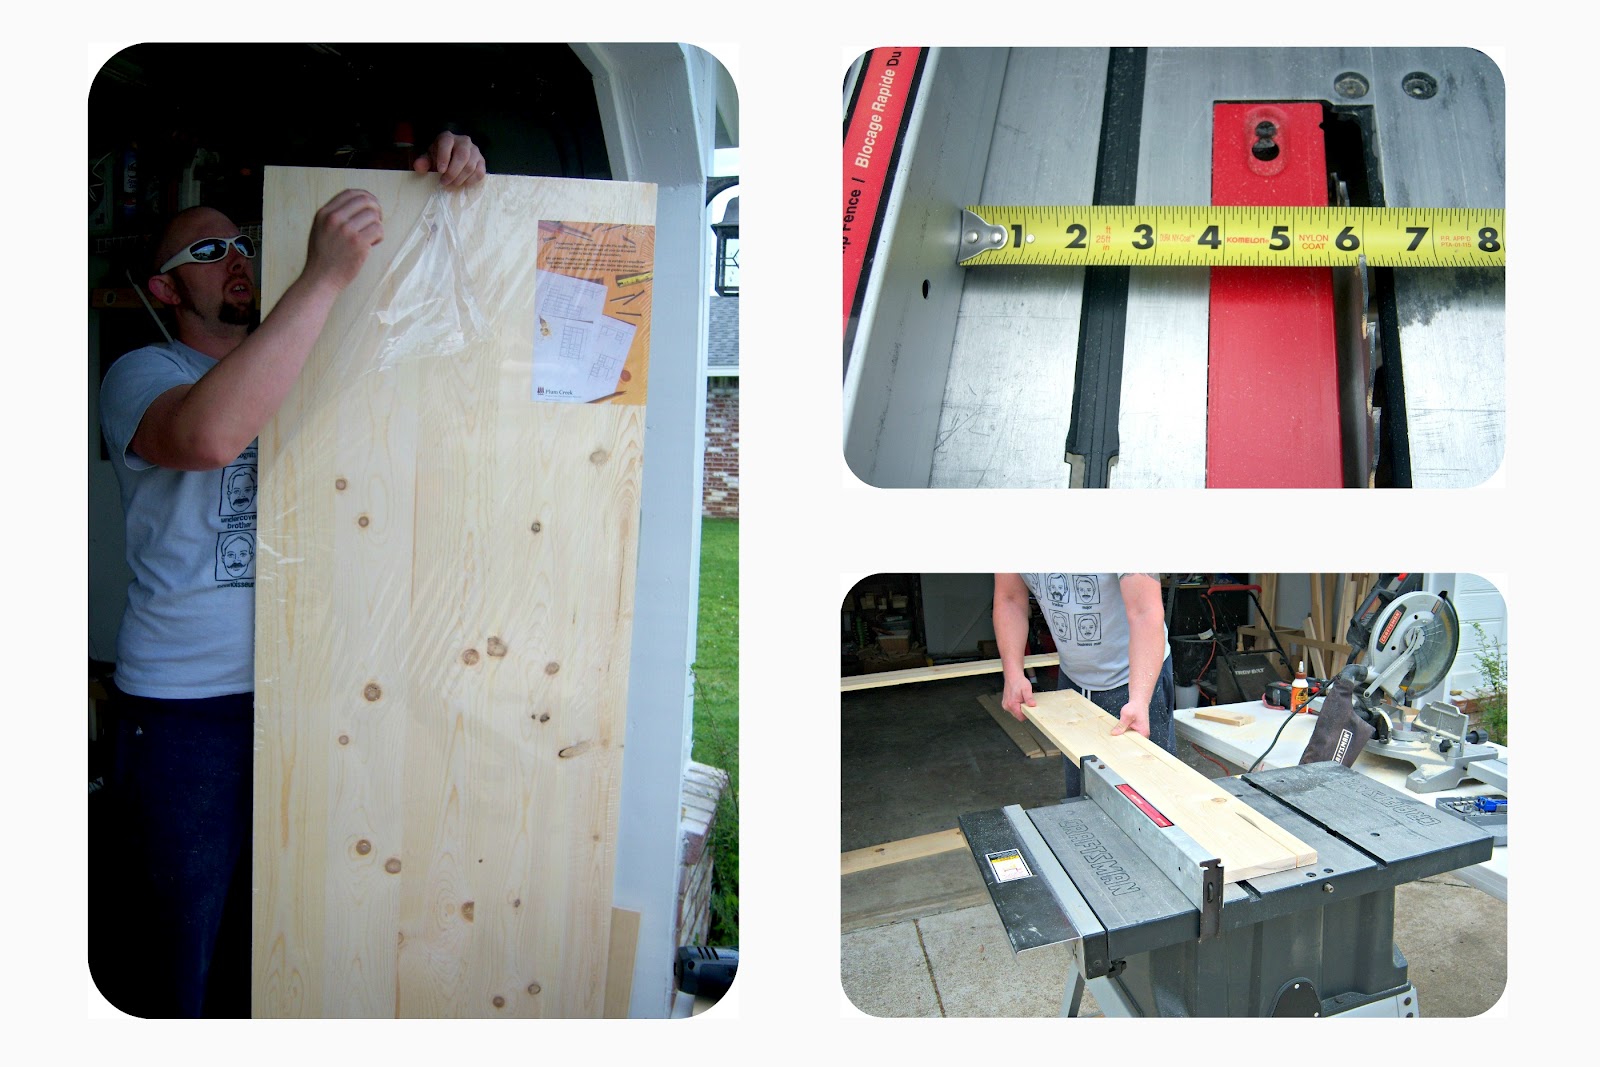
So, we did the next best thing. We took a million pictures, and we kept pages of notes.
------
So, the thing about this type of table is it's a very versatile thing. You can customize these plans to fit whatever your exact needs/wants are.
Since I already have my work table in my office, and we don't have a need for another one, the Hub's decided to re-build the fold out table as a fold out Lego table for the boys so we could get rid of their train table that takes up a ton of space, and is used purely for Legos at this point.


The exact specs of this particular tutorial are different from the original table, but the steps are essentially the same. Also, at the end of the tutorial, I do include the specs for the original table, as well as a couple instructions for the parts that differ from this second table.
We hope that the tutorial is easy to understand, and that you guys can make your own fold out tables for whatever your needs.
------
Supply List
1. (1) 2' x 6' Ponderosa panel (solid pine edge-glued panel)
2. (5) 6' long 1 x 8
3. (9) 6' long 1 x 4's
4. (2) 10' Plastic gutter (We got ours at Lowes)
5. Kreg Jig
6. Kreg self-tapping pocket-hole screws (sizes used were 2 1/2" for mounting to the wall. For everything else 1 1/4")
7. 6 x 1/2" Metal screws
8. (2) Exterior hinges
9. (2) Interior hinges
10. Latch
11. Wood glue
12. Brads 1" or 1 1/4"
Part 1
Wall Box
1. Using (2) 6 ft. 1 x 8, cut the top and bottom pieces for the box to 51 1/2".
2. Using (1) 6 ft. 1 x 8, cut the two side pieces for the box to 30".

3. Measure for the screw placement on the top and bottom pieces to attach to the side pieces.
* Measure 3/8" in from the edge. Space the screws evenly.
*Because of the width of this particular box, my Hub's went with 3 screws (don't forget to space
evenly).

4. Apply wood glue to the end of one of the 30" side pieces.
5. Line it up with the top piece and screw the side piece and top piece together.
6. Repeat for the other side piece.
5. Turn those 3 pieces (that are now screwed together) upside down.
6. Apply glue to the side piece ends, then line up the bottom piece, and screw together.


Part 2
Table Top
1. Using a circular saw, cut the panel piece to 49 7/8" (1/8" shorter than the opening, this is so the table top won't rub when it folds up).
---
The table top panel only comes in 24" at our local Lowes, so my Hub's had to cut a 1 x 8 to 5 7/8"W x 49 7/8' L, and then scab that piece together with the panel to make the table top 29 7/8"(for the same reason as the cutting the width of the table to 49 7/8")
If you need to scab your wood together also:
1. Measure 2" and 16" in from each end of the 5 7/8" piece, and mark those measurements.
2. Measure 9" from either side, and 25" to the center of the panel so that the screws are offset and coming from both sides of the panel and the 5 7/8" scab piece
3. Use your jig to drill holes at each mark


4. Apply wood glue to the edge of the 5 7/8" scab piece, and then screw the panel piece, and the 5 7/8" pieces together.

**They do make Kreg jig plugs for filling in those jig holes if you want them filled in.
Part 3
Interior Hinges
1. Measure 3/4" in from the edge, and then 10" in from each side on the inside of the bottom piece of the wall box. That mark will be where the center of your hinge will go.
2. Screw your hinges on.

3. Attach tabletop to the hinges per directions provided with hinges.

Part 4
Frame
1. Rip (3) 6 ft. 1 x 4's down to 2" wide.
2. Then cut two of those to 51 1/2" (long point to long point of a 45 degree angle).
3. Using the third piece, cut two pieces to 31 1/2" (long point to long point of a 45 degree angle).
**The Hub's stacked the pieces, and cut them at the same time to make sure that they're cut exactly the same.
To position the table so that the frame could be attached (and to keep the table top from going through the box), clamp some spare wood to the inside of the box, and then lean the table back. (see picture above)
4. Apply wood glue to the frame pieces, and then nail into place with brad nailer (1"-1 1/4" brads).
*Make sure that frame pieces are held flush with the outside edge of the box when nailing.*
*Make sure that frame pieces are held flush with the outside edge of the box when nailing.*

Part 5
Legs And Center Frame
1. Rip 1 x 4 to 2"
(The leg/frame will be 15" wide over all)
2. Then cut 26 5/8" x 2" (cut 6 of these two of which will be used for the center frame sides ) ("A") side pieces.
3. Cut 11" x 2" (cut 4 of these) ("B") top and bottom pieces.
4. Using the kreg jig drill 1 hole in the center of each 11" piece.
5. Attach "A" to "B" using wood glue and screws, clamp together to help hold them, and keep them flush.
**Repeat for the second leg!
**Repeat for the second leg!

6. Attach hinges 4" to hinge from the inside of the frame
7. Attach legs to the hinges leaving a 3/8" gap all the way around

8. Cut side leg trim pieces 26 5/8" (long point to long point of a 45 degree angle) (x6 of them two of these will be for the center frame)
9. Put trim piece on edge on the hinges hinge and mark to notch for hinges. (pictured below)
10. Place trim piece flat next to hinge to scribe exact depth to notch for hinge.(pictured below)

11.Square lines across for notch and cut with circular saw (reference picture for notching procedures).

12. Cut top and bottom pieces 15" (long point to long point) of a 45 degree angle (x4)
13. Glue and nail trim pieces to legs.
Center Frame
1. Cut side pieces 26 5/8" (x2) (should already have these from previous "leg" steps)
2. Top and Bottom 11 3/4" ---Overall width 15 3/4".
3. Cut the top and bottom trim pieces 15 3/4" (long point to long point 45 degrees).
4. Glue and brad nail frame to center and trim to center leaving a 3/8" gap all the way around.

Top Latch
Find center and attach.

Part 5
Inside "Stuff"
Trays:
1. Cut gutter to 16" (x10). Drill holes for screws to attach sides (See pictures below!).
2. For inside tray rails (aka vertical side pieces) cut 1x4x30" (x 4).
Spacing for the trays: From top of the side measure, 3" to the top of the first tray then 5 1/2" to the top of every other
3. Mark center of rails (1 3/4") and center of tray (1 3/16") down from each of the marks made for the tops of the trays (i.e. from the 3" mark measure down 1 3/16" then from each mark after that do the same) these will be the center marks for the 3/8" dowel holes. (*see picture below*)
4. On one rail of each set of rails measure in from one side 1 1/4" and up from the center of each of the 3/8" dowel holes 2 1/2" and this will be the center of the holes for the stoppers to keep the trays from completely flipping over. (*see picture below*)
5.Drill these "stopper" holes with a 5/16" drill bit only half way through.
6. Cut dowels 3/4" long and glue in place. (*see picture below)
Tray sides
Scribe with inside of the gutter. Cut one and use as a template for the rest (in this case, 20 total)

Attach the sides to the gutters with 1/2" metal screws, 3 per side (one on each side and one on the bottom as pictured below)
Mark the center of the tray sides and drill sides wit 5/16" drill bit
(Tip: Use a piece of tape on your drill bit for a depth indication. Only drill half way into the sides of trays. You may also be able to find a gauge that attaches to your drill bit at a hardware store. My hub's came in a doweling kit.)
Drill tray rails with a 3/8" drill bit. the bigger hole allows the trays to pivot (Tip: You can drill two at a time. Clamp them together, but make sure to drill straight through to the lines line up after being separated. Also, it is good to use a scrap piece of wood as backing to prevent the wood from splintering. )

Cut (20) 5/16" dowels to 1" in length for use in tray sides. Put glue into the holes then lightly tap dowels into them

Shelves
1. Rip a 1x8x6 to 6 5/8" wide.
2. Cut (2) side pieces to 30".
3. Cut 2 shelf pieces to 13"
4. Measure from the top of the shelf sides down 10" and 20" and these will be the centers of the shelves.
5.At the tops and bottoms of each of the sides drill evenly spaced holes with your jig to make it easier to attach.

Part 6
Mounting The Box To The Wall
First find the center of the wall you will be mounting the table to.
Find the studs in this area that the table will be in on the wall then figure for the size of the box (i.e. mark the sides of the table out on the wall so you know how many studs the box will mount to).
From one of the marks on the wall that represent the sides of the box measure to each stud line then mark those measurements out on the inside top and bottom pieces of the box. This is where you will drill holes with your jig to screw the box to the studs you have marked out on the wall (*pictured below*) (metal "L" brackets can also be purchased at most hardware stores to mount to the wall if you want another way to attach it to the wall).
Measure 16" up from the floor and make a mark (this will be to the bottom of the box) from that mark level across and make a line.
Cut two boards 16" to set the box on to help hold it while screwing it to the wall (it is good to have someone assisting to help hold the box so it does not fall on you.....Safety First!).


Remove the table top from the box leaving the hinges attached to the box.
Set the box on the 16" boards and screw to the studs. My Hub's used 2 1/2" pocket hole screws three top and three bottom but it never hurts to use a longer screw.
Once the box is mounted to the wall reattach the table top to the hinges.

Part 7
Installing The Inside "Stuff"
First slide the shelves in, center them up and put screws in the top and bottom holes.


Next lay one tray rail flat and place each one of the dowels on the sides of the trays into each hole so that the trays are standing vertical. Now take the opposing rail and line up the dowels with the holes and fit on top.


Grab the rails keeping pressure towards the center of the trays, pick the whole thing up and slide into opening to the left or right of the shelves and then repeat with the other set of trays. (*pictured above*)
Slide trays back until they just touch the wall and nail side rails in place with a brad nailer.
*Repeat steps for second set of trays*


Stand back, admire your work, and then get to work making it pretty. Ha!


The Original Work Table

Wall box:
Top and bottom pieces- 36"
Sides- 35 1/4" x 5 1/2" wide (1 x 6)
Table:
34 1/4" w x 35" l
Exterior frame:
Top and bottom pieces- 36" x 2 1/4" (long point to long point)
sides- 36 3/4" x2 1/4" w (long point to long point).
Rip a 1 x 4 to get these pieces.
Rip a 1 x 4 to get these pieces.
Legs/center frame:
Top and bottom pieces 31 1/4" x 3 1/2" ({2}1 x 4's)
sides- 24 1/4" x 3 1/2" ({2}1 x 4's)
leg frame trim:
Top and bottom- 31 1/4"(long point to long point) x 1 1/4" wide (1x4)
sides- 31 1/4" (long point to long point) x 1 1/4" wide (1 x 4)
**For these pieces, use the drop offs from the exterior frame cuts.
**For these pieces, use the drop offs from the exterior frame cuts.
Shelves:
Sides- 35 1/4" l x 2 3/4" w (x 2)
Shelves 32 7/8" x 2 3/4" w ( x 4)
Space shelves according to your needs.
For the exact spacing on my table, from the top of the shelf sides, measure down 5" to the top of the first shelf, then 10 3/4" to the top of the next shelf, and then 16 1/2" to the top of the next shelf, and then 25" to the top of the last shelf.
Dowels- 34" x 3/8" (x 4)
*From top of shelves measure up 1 3/8" to the center, and back 1/4" to the center.
*Last shelf, measure up 2 3/8" to the center, and 1/4" back to the center.
**These are your center marks for the dowels.

(This picture shows where the dowels are hitting, and how the screws go into the bottom of the shelves.)
If you do build your dream table, we would love to see pictures, so please email away!
Happy building!
Linking to:
Show and Tell on Blue Cricket Design
Tatertots and Jello Weekend Wrap up Party
Truly Lovely Fancy This Fridays
Positively Splendid's Saturday 7 Party


I don't have a very handy fiance (shhh) so can I borrow your husband to make one for me?
ReplyDeleteI'm after Lauren! Send him over! We'll do his laundry and feed him!
DeleteI see you love the Steelers too! I have been a fan since I was the age of your boys. Thanks to you and yours for the wonderful tutorial.
ReplyDeleteI love this and want one so much, but like Lauren, my husband is busy with school and I wouldn't trust myself. Can he make them and ship them to me?
ReplyDeleteThank you for posting this tutorial!!
This comment has been removed by a blog administrator.
ReplyDeleteI posted this tutorial for the sole purpose of allowing people to create their own version of this DIY. Obviously, there are companies that sell products similar to this, but my blog is not the place for free advertisement of those businesses.
DeleteGood for you! I always remove that spammy stuff too. :) Great job on the table tute. I can't wait to (make my husband) try it someday!
DeleteHoly wow lady! This thing is amazing!!!
ReplyDeleteI need one in my office, actually 2, or maybe even 3... and definitely one in my garden... and one in the playroom, make that 2 in there too. ;)
Wanna come visit and go to the beach and grate cheese together and then make some of these together? ;)
Love ya!
That is so awesome! :)
ReplyDeleteStopping by from TT&J--such a clever idea!
ReplyDeleteOh my, I want one of these for my sewing stuff in my tiny apartment. I need to hire you to fly over to Hong Kong, bring the wood with you and tools and make me one :o) amazing!!!
ReplyDeleteMy son is sitting next to me, drooling over that lego work table! So cool!!
ReplyDeleteThis is an amazing tutorial!!! That table is so neat! I'm visiting from Tatertots and Jello and a new follower! :)
ReplyDeleteAwesome work tables!!!! First, amazing that you (and your hubby) can do this and second, thanks for the amazing tutorial. Great details which are always important. I just may have to try this.
ReplyDeleteThese tables are awesome!
ReplyDeleteThank you guys for putting so much afford into creating this fabulous tutorial.
We will totally try this!!
:)
I am so glad I came over from TT&J! My husband and I were just talking about building something like this in the craft room he is building for me in our basement.
ReplyDeleteWould you consider linking up to my Pinworthy Projects Linky Party over at Just Us Four?
Thanks so much for taking the time and effort for this wonderful tutorial. May I ask what is an approximate cost to build due to any modifications one might make. Thanks again for doing this!!!!
ReplyDelete:) Of course! The lego table cost approximately $150.00 for all the materials, and the work table cost about $100.00.
DeleteThese tables are so cool! After featuring the idea you KNOW we had to FEATURE the ACTUAL tutorial! ;) Thanks for linking to Fancy This Fridays friend! Hope you'll check out your feature and grab a button! http://www.trulylovelyblog.com/2012/04/fancy-this-features-73/
ReplyDeleteThis IS AWESOME!!! I linked to it the first time I saw it and I am definitely linking to the tutorial. My viewers will love it! Thanks for sharing all the details. I'm featuring this tonight at somedaycrafts.blogspot.com.
ReplyDeleteYou're the bomb Andrea!! I saw a table similar to your smaller version on Home Decorator's site and knew it would be perfect for the hub's computer desk in our den--just couldn't find any "how-to". Your tutorial is the answer to my plea. I think I might just need one in my sewing room too:-) GO POKES!!
ReplyDeleteThat is just way to cool! I hope your boys know how lucky they are to have a daddy who can do stuff like that for them :)
ReplyDeleteOMG! I'm going to make this for my daughter's bday. She has a small apt. but needs some craft space and this tute is PERFECT! Thanks for sharing!
ReplyDeleteThat is just the neatest table/hide-a-way that I've ever seen. What a neat idea!
ReplyDeleteThanks so much for sharing. Going to get my husband to make at least one, maybe 2 for our girls playroom - great homework, drawing, keeping things out of the way tables! Thanks again, Great job!
ReplyDeleteWhat a great idea, especially those gutter tip out trays! I am starting to piece together my own crafting tables and will look at this when I have a lot more coffee. Phew! Those are some serious instructions!
ReplyDeleteDo you have a materials list for the Wall Box Table?? Toats going to have my hubby dust off his mad wood working skills for this! TFS!
ReplyDeleteI just found you on Pinterest and I LOVE you for posting this tute - thank you so much, I so want to build this.
ReplyDeleteFabulous idea, great job, looks awesome!!
xox
I love this!! Amazing idea that I'll have to try sometime. Thanks!
ReplyDeleteMy question is "Does the Frame 'leg' lock into place when in the down position?" I would hate to have all my stuff laid out on the table and have the leg support bumped and the table go crashing down? If it locks, then how do you do that?
ReplyDeleteThis is totally sweet!!
ReplyDeletejust curious if your hubby would be willing to make one to sell?There are WaY TOO MANY ITEMS needed to make it(wood cutters n such)If price were no object for the buyer how much would your hubby charge someone -to make them one of the nail ones?includin shipping to michian????
ReplyDeleteSo, My husband has been working on plans to build me a table similar to this in my new sewing room. Your ideas are fantastic, but I am curious how sturdy it is. I will be using it as a cutting table for quilting and other sewing projects, Do the hinges and the frame leg hold up well to that sort of pressure (pushing down to get nice clean cuts. Also, have you had any problems with the frame leg getting knocked out, I am concerned about bumping it myself, or my little ones bumping it and knocking things down or breaking the table. Have you had a problem with that?
ReplyDeleteCan't wait to make one for my craft room. Do you think it would hold the weight of a sewing machine?
ReplyDeleteJust wanted to share, my Dad made the Lego cabinet for my youngest son. It is AWESOME!! I used camo ductape (he has an Army room) along the top edges of the "gutters" because they were a little sharp. It looks good and added to the inside. Thanks for this tutorial!
ReplyDeleteAWESOME!!! I passed this on to my hubby, and I think it made his whole month he was so happy! :) We would absolutely LOVE to see pictures if you feel like sharing!
DeleteIf you do, just hit the "contact" tab at the top, and my email should pop up!
Also! Awesome idea to use the ductape!
Aw.Some! I can see it in the laundry room as a table for folding clean laundry and space to store stain spray, etc. inside.
ReplyDeleteThis is so awesome! I can think of so many places we could use this.. without a doubt a must need for my sewing room, kids rooms, garage for a variety of things. I'm thinking this would be great in my garage to pot up plants for my gardens (can store small garden shovels, etc.). Thank you for sharing!
ReplyDeleteThis is so neat! I would love to have my husband build one........but I'm out of wall space! Thanks for sharing!
ReplyDeleteThis is such an awesome idea! Your hubby did a fantastic job. Hope I can get mine to make one. Would be perfect for my beading stuff. Not sure if it would be sturdy enough to do any hammering though...probably knock everything off the shelves.
ReplyDeleteThat is SUCH an awesome idea!!! I'm trying to makeover my office/craft room, and this would be great since I have such a small space. Love it!!!
ReplyDeleteWow! Definitely going to put this on my craft room idea board. Thank you to you and the hubs for putting together such a fantastic tutorial!
ReplyDeletethis is so amazing! well done hubby!! and thanks so much for sharing in such wonderful detail.
ReplyDeleteAHHHHH! Best ide EVER! Can't wait to build this table! Thanks so much for the great tutorial!
ReplyDeleteI love that you guys are a house divided. My father went to OSU (and was pushing me to go there as well) and my aunt (his sister) wen to OU. It is the funniest thing to watch them call each other whenever their team wins. :)
ReplyDeleteOne another note. I adore this. I might just have to attempt to make this myself when I have the room for it.
So- my hubby and I are trolling around pintrest when we see this FANTASTIC frame/picture/storage cabinet of awesomeness and just HAVE to check out the tutorial! Of course, we're impressed- and- of course, giving your hubby a round of applause when we see "a room divided- OSU/OU"... Okay- two things:
ReplyDeleteOne- BOOOMER SOONER!
and Two- my boys and I are currently serving overseas in jolly ol' England... Needless to say- seeing anything US makes us happy, anything Oklahoma makes us giddy and anything Sooner makes us jump up-and-down like teenage girls at a Bieber concert!!
Love this and love the Oki pride! Y'all just made my weekend!
Steeled Nation all the way!!!
ReplyDeleteI really wish I had come across this concept three years ago when I built a tole paint cabinet for my wife which is similar in size. I drew up your plans on a CAD program and while I'll admit I have a tough time following directions, I can't get the pieces to fit. After comparing your directions to your photo, I can't make sense of your description and parts regarding Wall Box and Exterior Frame. Your picture makes sense, but comparing parts list and photo do not. Or, am I missing something? Kudos to your husband for his ingenuity on the concept and workmanship.
ReplyDeleteJohn I'm currently in the process of finishing up my build of one of these, the description and correlation to the picture are kind of vague, I'd be more than willing to answer any questions you have regarding how certain things were accomplished. They may not be 100% way Andrea and her husband did them, but they still accomplish the same feat.
DeleteI will have my hubby look over the tutorial again and see if there is something I mistyped that can clear up any confusion about the part you guys are talking about... This stuff is over my head :)
DeleteI love this! Thank you so much for doing a blog post with a tutorial! Also I love the OU/OSU on the outside of it! We live in a house divided!
ReplyDeleteEEK, I have had something like this in my head for years! I'm so going to show this to my guy so he and his dad can make me one!!!!!
ReplyDeleteWOW what a lot of time and effort you put in to this tutorial and that piece of work! Thank You!
ReplyDeleteJust had my friend's dad install my new beautiful fold up table for my birthday thanks to your blog post! Here it is if you'd like to see how it turned out: http://chinookdesigns.blogspot.com/2012/12/older.html
ReplyDeleteI will try to make one of this for my boy's Hot Wheels with a race track drawn on the table. Excellent idea. thanks so much for sharing!!!
ReplyDeleteI'm planning to do something like this for my son's kitchen because he has NO counter space - and to save even more space, we'll put the box into a hole between the studs on the wall.
ReplyDeleteThis is insane. It's wonderful in every way. Very, very clever. Prux
ReplyDeleteI pinned this the first time because I loved it and had to pin it again with all the instructions! What a wonderful ingenious idea! Thanks so much for sharing and now sharing the step-by-step instructions! I love it!
ReplyDeleteHi! I love your concept, and I'm planning out how to build my own. However, I have some questions about the mechanics of your design, especially the leg(s).
ReplyDelete1) How do you get the leg(s) to lie flat against the underside of the table, while still being able to provide support when folded out? I've read and reread and rereread the section on the legs, but I still don't get it, and the pictures aren't really helping (sorry!).
2)How do you keep the leg(s) from swinging out when the table is folded up? I don't see any kind of latching mechanism, and I didn't see any mention of it in the tutorial. Are you magic?
Thanks for your help, and for providing such an inspiring project!